Your Cart is Empty
How To Make A Boutonniere
Description

Tutorial brought to you by Jenny Zukovsky of Fionna Floral
Fionna Floral is a premier full service floral design company specializing in weddings and events in Northern and Central Coast California. In this DIY project, Jenny will show you how to make a boutonniere for a prom or a wedding in a few simple steps.
Notes from Jenny: Boutonnieres can be made a day ahead of your event, and stored in a cooler with a temperature between 40° to 42° F. Make sure that there are no tomatoes, berries, or apples in your cooler space, as these fruits emit ethylene which will damage fresh flowers. Use sturdy product to ensure that your boutonniere will last through all of the hugs, kisses and photos of your special day!
Materials
- Ribbon Scissors
- Floral Clippers
- Ribbon in 5/8” to 1” width
- Floral Tape
- 18 Gauge Floral Stem Wire
- Flowers & Foliage
Instructions
- Select the flowers and foliage you will use in your boutonniere. Use sturdy materials, and if you live in a hot humid climate, you'll want to use flowers that can withstand the day without wilting. Flowers that hold up reasonably well in hot weather include Carnations, Standard Roses, Calla Lillies, Cymbidium orchids, and Dendrobium orchids.For our boutonniere, we used Exclusive Sin Rose sprays, Chinaberries, Rosemary, French Lavender, Passion Vine, and Geranium leaves.

- Use one to two roses for a boutonniere. Cut the rose bloom off the stem, leaving a mere ¾” to 1” of the stem. For a cleaner, more petite bloom such as the small rose in our boutonniere, pinch the outer guard petals off the bloom. You may choose to leave the guard petals on the second bloom for contrast as we did here.


- Cut your 18 gauge floral stem wire into three approximately 6” sections.

- Cross the wire through the base, or calyx, of the rose bud taking care not to hit the bloom (this could result in severing the bloom from the calyx).


- Bend the ends of the floral wire down, and hold between your thumb and forefinger.

- Adhere the floral tape where the floral wire crosses through the calyx, and then unroll about 7 inches of tape to work with.
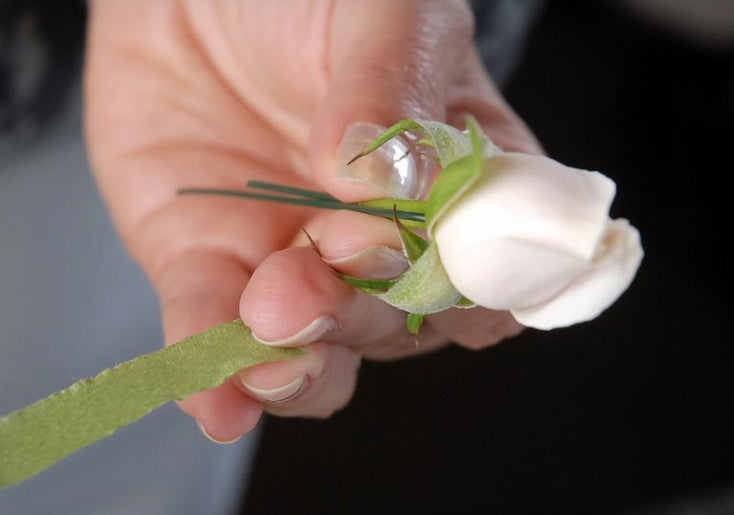

- Always pulling the floral tape taut (this activates the tape’s tacky quality), twist the floral tape downward around the floral wire and toward your body (counterclockwise motion) to cover the wire completely. When you reach the bottom of the wire, pinch the tape off.


- Repeat steps two through seven if you are using a second large bloom in your boutonniere. Some people prefer to work with 28 gauge wire because it is easier to bend. If you are using higher gauge floral wire (the higher the gauge, the finer the wire), cross two pieces of floral wire through the calyx to make an X shape, and bend down before taping.

- Position the two rose blooms together, and then tape their stems together so that you have one new thicker stem to work with. This will be the sturdy centerpiece of your boutonniere. Arrange your accent foliage – we used French Lavender, Rosemary, Chinaberries, a tiny curly flourish from a Passion Vine, and a Geranium leaf – around the roses in any way that looks good to you. When you’ve settled on an arrangement you like, wrap floral tape around the entire ensemble to create one new stem.


- Use floral clippers to trim to size – an approximately 2” to 2-1/2” stem worked to balance out our arrangement.


- To give your boutonniere a finished appearance, wrap it in unwired ribbon sized 5/8” in width up to 1” in width. Hold one end of the ribbon against where the tape begins, just under the exposed foliage. Pull the ribbon down vertically to cover the full length of one side of the taped stem, and then up the other side just a tiny bit. Twist the ribbon toward you, and begin spiraling the ribbon diagonally up the taped stem.


- When you have reached the top of the stem, pinch the ribbon in place and cut your ribbon from the spool, giving yourself more than you’ll need to tie a simple knot at the top of the stem.

- Make a loose loop with the ribbon around the base of the foliage and slip the end of the ribbon through, pulling it into a firm knot.

- You can cut the ribbon here, or – as we did – make an extra little flourish with your ribbon by pinching a small loop at the base of your foliage, and pinning it in place with a corsage pin. Pin upward at a diagonal angle, being careful not to poke your rose buds with the end of the pin.

