Your Cart is Empty

DIY: How to Make a Wreath


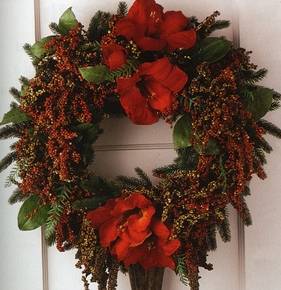
Photos show two wreaths made by Kate Furr Oregon City, Oregon her blog is Life on the farm:
Fresh wreath, swags, garlands and trees.
Wreaths
Fresh greenery wreaths provide the senses with many delights. Not only do they look beautiful, but they perfume the air around them. Pine boughs, ivy, eucalyptus sprays, box hedge stems and ferns are just a few kinds of fresh greenery you can use to make wreaths. Best to work on a table when preparing your wreath form and later to hang it up to add the decorations and final touches. It is easier to see where you need to add leaves, flowers, ribbons etc., when you are face to face with your wreath.
Fresh Greens 1
. Make a base using two wire coat hangers. Wire the hangers together and cover with floral tape.

2. Cut several 8" to 10" long branches of greenery (redwood, pine, douglas fir etc.)
3. Using , secure the branches to the wreath base. Overlap the stems. Keep adding stems until the wreath base is fully covered.

4. Secure decorations with floral wire or hot glue.


Spring Greetings: A radiant wreath welcomes guests from Florist's Review 101 Silk and dried designs
Golden preserved roses, elegant green preserved hydrangea and intriguing green caspia and yarrow lavishly decorate a fern enhanced base that is enlarged by the addition of honeysuckle vine secured int othe wreaths center. The added vine widens the wreath base and enables a larger canvas onto which the luxuriant materials can be artfully arranged. The oversized composition, which is rich with the textures of feathery fern fronds and a berried garland woven among the blossoms, can bedeck a wall or door, or even be laid atop a table, beginning in spring and continuing throughout the summer.
Materials: preserved roses
hydrangeas
yarrow
fern
Asian honeysuckle vine
grapevine wreath form or smilar wreath form.
silk berry garland
wood picks and pan melt glue.
Floral Wreath
It is an old Greek custom to hang a wreath of fresh flowers on your door to celebrate special occasions. The rings are made of grass, raffia, vines or any other material. The stems of the flowers are cut to three inches or so and wired onto the garland.
1. Gather a bundle of long grass. If the grass is too dry to shape into a circle wet it down before shaping it and binding it with fishing line, twine or floral wire.

2. Bind small bunches of flowers together using floral wire. Leave some of the larger flowers separate.

3. Randomly secure the bunches of flowers and the single ones to the grass wreath.

Wet Foam Floral Wreath or Centerpiece
1. You will need a , foliage, flowers and two yards of thin satin ribbon.
2. Dip the base in water until the is damp but not fully saturated. The base will drip when you hang it if you over-soak it. (Soak it if you plan to use it as a centerpiece).
3. Insert the foliage first. Keep the stems short and fill the entire wreath with a green background.

4. Insert the flowers spacing them evenly around the circle.

5. Complete the wreath by winding the in soft curls throughout the flowers.

All about Wreath Forms
There are 7 basic wreath forms -, , , nito, , and . There are many variations in sizes and shapes of these basic forms.


How to make wreath hangers
Make a wreath hanger before you begin to decorate your wreath. It establishes the top, and you can hang your wreath in front of you while you decorate. You may choose not to use your hanger to attach the wreath to the wall. Styrofoam, wire and straw wreaths are light and flat enough to hang on a nail. If your wreath is heavily decorated on one side, however, you will need a hanger to keep it centered. Grapevine and Nito wreaths need the support of wire hangers. The vines are irregular and in most cases cannot be hung on a nail. To make a hanger for a grapevine wreath, look at the shape of the wreath to determine the top. Then, slip a around a few branches in the back, at the top of the wreath. Wrap it around a few times and twist the ends of the wire. Make sure the loop is secure.
1. Twist a circle in a medium gauge wire.

2. Push the end of the wire in the back of the wreath base.

3. Secure the ends by pushing them into the back of the wreath.

Basic Wreaths Designs and Instructions
How to make a simple garland wreath
Best to work on a table when preparing your wreath form and later to hang it up to add the decorations and final touches. It is easier to see where you need to add leaves, more flowers, ribbons etc., when you are face to face with your wreath.

Cover a with . Secure the moss with . Then, unwind the garland and lay it around the wreath. Cut off the excess garland and attach the greenery to the wreath with more .
Use the excess garland to fill in any sparse areas. Then hang the wreath up to add fruit, tiny flowers... anything you like, or leave it green or just with the flowers it came with it.

If you want to add berries or single flowers to the wreath and the stems are too soft to penetrate the wreath form you will need to wrap a around the end of the stem, double it over, twist it, and then insert it in the wreath base. Or use to attach the flowers. Greening pins work great when adding multiple flowers and berries. Save your extra material in plastic bags for future projects.
Here are three sets of instructions for making a wreath on three different wreath bases. Follow " Line, Focal and Filler" to complete each wreath with a pleasing design.
Making a wreath with a Styrofoam Wreath Base

1. Make a hanging loop first. Then, cover the base with then secure it with

2. Line. Cut the greenery into 7" pieces and insert around the wreath facing the same direction.

3. Focal. Cut the lily stems to 4" long and, alternating from side to side, insert around the wreath.

4. Filler. Cut the dogwood into single stems with three flowers on each, and fill in all the empty spaces.
Making a wreath with a Straw Hay Base
1. Line. Make a hanging loop in the back of the wreath. Cut the heather stems from 2"-3" long, then use your to place three pointing to the left and two pointing to the right. Stagger the lengths.

2. Focal. Cut the black-eyed Susan stems to 5" long and hot glue them to the heather following the shape of the wreath.

3. Filler. Cut the field flower stems to 5" long and fill in the arrangement.
How to make a wreath on a Grapevine Wreath Base
1. Line. Make a hanging loop. Cut an ivy garland into 7" pieces and hot glue to wreath

2. Focal. Cut the stems to 2" and hot glue around the wreath.

3. Filler. Use a smaller flower to fill in around the lilies.
