Your Cart is Empty
Menu
-
- Shop By Event
- Naturals & Florals
- Crafts
- Vases
- Candles & Lighting
- Décor
- Ideas & Inspiration
- Sale
-
- Help
- FREE SHIPPING ON ORDERS OVER $79
- 1-800-928-6175
- Login
-
United States (USD $)

DIY: Headband Wedding Veil Project
July 11, 2018 2 min read
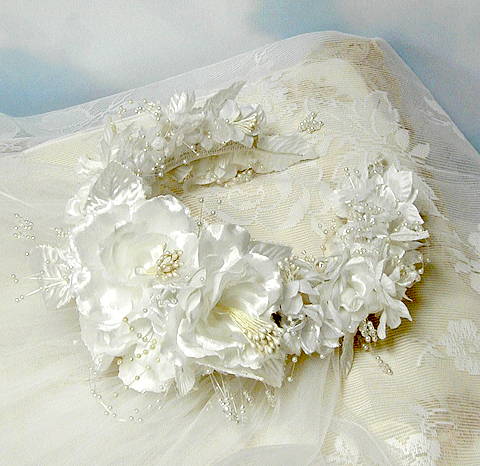
How to make a floral veil
The Veil:First decide what length you want. If you want the veil to fall just below your shoulders, at your waist, to your fingertips or to the floor.How much tulle or bridal illusion you will need to make the veil.For a shoulder (blusher) length 18"-24", waist length 30", fingertip length 38"-40", floor length 60"-72" . Always use 108" wide tulle or bridal illusion.You can also use organza, but unlike tulle and bridal illusion you will need to finish off the edges or it will unravel. A narrow rolled edge works well or you can bind the edge easily with a strip of satin bias tape that matches your gown.Lay out the tulle, fold it in half and use small weights along the edges to keep it in place. Using a piece of chalk or pins trace a curve so you can shape the bottom of the tulle into a curve. You are just slightly rounding the veils edge. Now cut the veil along the marked area with dressmaking scissors.Unfold the tulle. You are now going to gather the top of the veil ( the straight edge).To do that you need a heavy thread and a needle. Use a running stitch with thick button thread - sew all the way across the top of the veil.Once you are done, hold one end of the tulle & thread and push the tulle edges together. This will crimp (and gather)the tulle making the top edge of the veil smaller so it can be easily attached to the headband with glue. (see instruction below)Materials needed:- Satin headband
- Veil tulle and bridal illusion
- 2 Pearl Sprays
- 3 Medium Size White or Cream Flowers
- 8 Smaller White and Cream Flowers
- Glue Gun & Glue Sticks (Lo Temp)
- Fabric Glue
- See all the millinery supplies